configure Samba 4 AD DC for the SOHO business.
davor:*:101106:100513:Davor Vusir:/home/davor:/bin/bash
root@server#
[global]
.
winbind use default domain = yes
disable spoolss = yes
[home]
path = /home
comment = "Home directories"
writeable = yes
browsable = yes
map archive = yes
map hidden = yes
map system = yes
nt acl support = yes
inherit acls = yes
inherit permissions = yes
store dos attributes = yes
vfs objects = acl_xattr recycle
acl_xattr:ignore system acl = no
recycle:keeptree = yes
recycle:versions = yes
recycle:maxsize = 1073741824
csc policy = programs
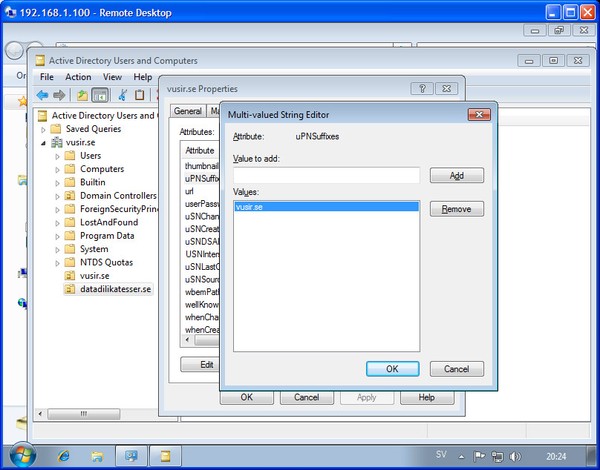
Start Active Directory Users and Computers and add a user and group that is used for fileaccess purposes. I often use the syntax <Company|Department|Other>-FileAcc<Sharename> to easily see what access this group will handle.
davor@localhost's password:
Welcome to Ubuntu 12.04.2 LTS
* Documentation: https://help.ubuntu.com/
System information as of Sun Jul 28 07:47:17 CEST 2013
System load: 0.41 Processes: 202
Usage of /home: 2.1% of 196.86GB Users logged in: 1
Memory usage: 20% IP address for br0: 192.168.1.3
Swap usage: 0%
Graph this data and manage this system at https://landscape.canonical.com/
0 packages can be updated.
0 updates are security updates.
The programs included with the Ubuntu system are free software;
the exact distribution terms for each program are described in the
individual files in /usr/share/doc/*/copyright.
Ubuntu comes with ABSOLUTELY NO WARRANTY, to the extent permitted by
applicable law.
Last login: Sun Jul 28 07:26:10 2013 from localhost
davor@server:~$ pwd
/home/davor
davor@server:~$ ls -al
total 32
drwxrwx---+ 2 davor root 4096 Jul 27 07:39 .
drwxrwx---+ 10 root root 4096 Jul 27 07:52 ..
-rw-------+ 1 davor Domain Users 213 Jul 28 07:27 .bash_history
-rw-rw----+ 1 davor Domain Users 698 Jul 27 07:39 .viminfo
davor@server:~$
Redirection was successful.
C:\Users\Administrator>redircmp ou=Computers,ou=vusir.se,dc=vusir,dc=se
Redirection was successful.
C:\Users\Administrator>
Computer Configuration / Policies / Windows Settings / Security Settings /
Run logon scripts synchronously - Enabled
Run logon scripts visible - Enabled
Windows Components/Attachment Manager
Windows Components/Network Sharing
Properties
Location \\server.vusir.se\home\%USERNAME%\Documents
Reconnect Enabled
Label as Home Directory
Use first available Disabled
Hide/Show this drive No change
Hide/Show all drives No change
Common
Options
Run in logged-on user's security context (user policy option) - Yes
Remove this item when it is no longer applied - Yes
total 180
drwxrwx---+ 9 davor root 4096 Jul 28 13:02 .
drwxrwx---+ 10 root root 4096 Jul 28 09:36 ..
drwxrwx---+ 2 davor Domain Users 4096 Jul 28 13:02 Appdata
-rw-------+ 1 davor Domain Users 270 Jul 28 08:46 .bash_history
-rwxrwx---+ 1 root Domain Users 88782 Jul 28 12:35 Computer-StandardSettings.htm
drwxrwx---+ 2 davor Domain Users 4096 Jul 28 13:02 Contacts
drwxrwx---+ 2 davor Domain Users 4096 Jul 28 13:02 Desktop
drwxrwx---+ 5 davor Domain Users 4096 Jul 28 13:02 Documents
drwxrwx---+ 2 davor Domain Users 4096 Jul 28 13:02 Favorites
drwxrwx---+ 2 davor Domain Users 4096 Jul 28 13:02 Links
drwxrwx---+ 3 davor Domain Users 4096 Jul 28 13:03 Searches
-rw-rw----+ 1 davor Domain Users 24 Jul 27 07:36 testfile.txt
-rw-rw----+ 1 davor Domain Users 895 Jul 28 08:45 .viminfo
davor@vastraaros:~$
davor:*:101106:100513:Davor Vusir:/home/davor/Documents:/bin/bash
root@vastraaros:~#
davor@localhost's password:
Ubuntu comes with ABSOLUTELY NO WARRANTY, to the extent permitted by
applicable law.
Last login: Sun Jul 28 13:01:17 2013 from localhost
davor@vastraaros:~$ pwd
/home/davor/Documents
davor@vastraaros:~$ ls -al
total 48
drwxrwx---+ 6 davor Domain Users 4096 Jul 28 13:03 .
drwxrwx---+ 9 davor root 4096 Jul 28 13:02 ..
drwxrwx---+ 3 davor Domain Users 4096 Jul 28 13:03 My Music
drwxrwx---+ 3 davor Domain Users 4096 Jul 28 13:03 My Pictures
drwxrwx---+ 3 davor Domain Users 4096 Jul 28 13:03 My Videos
drwxrwx---+ 2 davor Domain Users 4096 Jul 28 13:03 $RECYCLE.BIN
davor@vastraaros:~$
davor@vastraaros:~$ pwd
/home/davor/Documents
davor@vastraaros:~$ ls -al
total 64
drwxrwx---+ 6 davor Domain Users 4096 Jul 28 15:35 .
drwxrwx---+ 9 davor root 4096 Jul 28 13:02 ..
-rw-------+ 1 davor Domain Users 224 Jul 28 14:50 .bash_history
-rwxrwx---+ 1 davor Domain Users 402 Jul 27 07:34 desktop.ini
drwxrwx---+ 3 davor Domain Users 4096 Jul 28 15:34 My Music
drwxrwx---+ 3 davor Domain Users 4096 Jul 28 15:34 My Pictures
drwxrwx---+ 3 davor Domain Users 4096 Jul 28 15:34 My Videos
-rwxrwx---+ 1 davor Domain Users 0 Jul 28 15:34 New Text Document.txt
drwxrwx---+ 2 davor Domain Users 4096 Jul 28 15:35 $RECYCLE.BIN
davor@vastraaros:~$ ls -al \$RECYCLE.BIN/
total 24
drwxrwx---+ 2 davor Domain Users 4096 Jul 28 15:35 .
drwxrwx---+ 6 davor Domain Users 4096 Jul 28 15:35 ..
-rwxrwx---+ 1 davor Domain Users 129 Jul 28 13:03 desktop.ini
davor@vastraaros:~$
total 36
drwxrwx---+ 2 davor Domain Users 4096 Jul 28 15:39 .
drwxrwx---+ 6 davor Domain Users 4096 Jul 28 15:39 ..
-rwxrwx---+ 1 davor Domain Users 129 Jul 28 13:03 desktop.ini
-rwxrwx---+ 1 davor Domain Users 544 Jul 28 15:39 $IYDOHFR.txt
-rwxrwx---+ 1 davor Domain Users 0 Jul 28 15:34 $RYDOHFR.txt
davor@vastraaros:~$
total 24
drwxrwx---+ 2 davor Domain Users 4096 Jul 28 15:40 .
drwxrwx---+ 6 davor Domain Users 4096 Jul 28 15:40 ..
-rwxrwx---+ 1 davor Domain Users 129 Jul 28 13:03 desktop.ini
davor@vastraaros:~$
get SOGo, iRedmail and Samba 4 AD DS in perfect harmony.
# Integrate Amavisd-new with OpenLDAP.
$enable_ldap = 1; # 1 -> enable, 0 -> disable.
$default_ldap = {
hostname => "127.0.0.1",
port => 389,
version => 3,
tls => 0,
timeout => 120,
base => "ou=%d,dc=datadilikatesser,dc=se",
scope => "sub",
query_filter => "(&(userPrincipalName=%s)(objectClass=person)(!(userAccountControl:1.2.840.113556.1.4.803:=2)))",
result_attribute => "userPrincipalName",
bind_dn => "cn=vmailer,cn=users,dc=datadilikatesser,dc=se",
bind_password => "Pa$$w0rd",
};
And restart Amavis: service amavis restart
Installing Samba 4 AD DS
Add the user account used for binding to the domain by the iRedmail suite:
samba-tool group add test --group-type=Distribution --mail-address=test@datadilikatesser.se
samba-tool group addmembers test davor

vi /etc/mysql/my.cnf
[client]
default-character-set=utf8
[mysqld]
...
character_set_server=utf8
character_set_client=utf8
[mysql]
default-character-set=utf8
service mysql start
mysql -u root -p
CREATE DATABASE `sogo` CHARACTER SET='utf8';
CREATE USER 'sogo'@'localhost' IDENTIFIED BY 'Pa$$w0rd';
GRANT ALL PRIVILEGES ON `sogo`.* TO 'sogo'@'localhost' WITH GRANT OPTION;
FLUSH PRIVILEGES;
exit
RequestHeader set "x-webobjects-server-port" "443"
RequestHeader set "x-webobjects-server-name" "mail.vusir.se"
RequestHeader set "x-webobjects-server-url" "https://mail.vusir.se"
Redirect permanent /index.html https://mail.vusir.se/SOGo
ServerTokens Prod
ServerSignature Off
expose_php = Off
a2enmod proxy
a2enmod proxy_http
a2enmod headers
a2enmod rewrite
OCSEMailAlarmsFolderURL = "mysql://sogo:Pa$$w0rd@localhost:3306/sogo/sogo_alarm_folder";
OCSFolderInfoURL = "mysql://sogo:Pa$$w0rd@localhost:3306/sogo/sogo_folder_info";
OCSSessionsFolderURL = "mysql://sogo:Pa$$w0rd@localhost:3306/sogo/sogo_sessions_folder";
SOGoACLsSendEMailNotifications = YES;
SOGoAppointmentSendEMailNotifications = YES;
SOGoBusyOffHours = YES;
SOGoCalendarDefaultRoles = (
PublicViewer,
ConfidentialDandTViewer
);
SOGoContactsDefaultRoles = (
ObjectViewer
);
SOGoDayEndTime = 18;
SOGoDayStartTime = 8;
SOGoDefaultCalendar = personal;
SOGoDraftsFolderName = Drafts;
SOGoFirstDayOfWeek = 1;
SOGoFirstWeekOfYear = First4DayWeek;
SOGoFoldersSendEMailNotifications = YES;
SOGoIMAPAclConformsToIMAPExt = YES;
SOGoIMAPAclStyle = rfc4314;
SOGoIMAPServer = localhost;
SOGoLanguage = Swedish;
SOGoLoginModule = Mail;
SOGoMailMessageCheck = "every_20_minutes";
SOGoMailMessageForwarding = inline;
SOGoMailPollingIntervals = (
5,
10,
20,
30,
60
);
SOGoMailShowSubscribedFoldersOnly = YES;
SOGoMailingMechanism = smtp;
SOGoPageTitle = "Webmejlen";
SOGoProfileURL = "mysql://sogo:Pa$$w0rd@localhost:3306/sogo/sogo_user_profile";
SOGoSMTPServer = localhost;
SOGoSentFolderName = Sent;
SOGoSieveScriptsEnabled = YES;
SOGoSieveServer = "sieve://localhost:4190";
SOGoSupportedLanguages = (
English,
Swedish
);
SOGoTimeFormat = "%H:%M";
SOGoTimeZone = "Europe/Stockholm";
SOGoTrashFolderName = Trash;
domains ={
vusir = {
SOGoMailDomain = "vusir.se";
SOGoUserSources = (
{
CNFieldName = displayName;
IDFieldName = userPrincipalName;
IMAPHostFieldName = localhost;
UIDFieldName = userPrincipalName;
SOGoLDAPContactInfoAttribute = displayName;
// MailFieldNames = userPrincipalName;
SearchFieldNames = (
userPrincipalName,
displayName,
);
baseDN = "ou=vusir.se,dc=vusir,dc=se";
bindAsCurrentUser = YES;
bindDN = "cn=sogo,cn=Users,dc=vusir,dc=se";
bindFields = (
userPrincipalName,
displayName,
);
bindPassword = Pa$$w0rd;
canAuthenticate = YES;
displayName = "GAB - vusir.se";
hostname = "ldap://localhost:389";
id = VUSIR;
isAddressBook = YES;
type = ldap;
}
);
}; // END - vusir.se
datadilikatesser = {
SOGoMailDomain = "datadilikatesser.se";
SOGoUserSources = (
{
CNFieldName = displayName;
IDFieldName = userPrincipalName;
IMAPHostFieldName = localhost;
UIDFieldName = userPrincipalName;
SOGoLDAPContactInfoAttribute = displayName;
// MailFieldNames = userPrincipalName;
SearchFieldNames = (
userPrincipalName,
displayName,
);
baseDN = "ou=datadilikatesser.se,dc=vusir,dc=se";
bindAsCurrentUser = YES;
bindDN = "cn=sogo,cn=Users,dc=vusir,dc=se";
bindFields = (
userPrincipalName,
displayName,
);
bindPassword = Pa$$w0rd;
canAuthenticate = YES;
displayName = "GAB - datadilikatesser.se";
hostname = "ldap://localhost:389";
id = DATADILIKATESSER;
isAddressBook = YES;
type = ldap;
}
);
}; // END - datadilikatesser.se
}; // END - domains
SOGoVacationEnabled = YES;
WOLogFile = "/var/log/sogo/sogo.log";
WONoDetach = YES;
WOPidFile = "/var/run/sogo/sogo.pid";
WOWatchDogRequestTimeout = 10;
} // END Configuration file
Build a home server - take two, part 4.
Okay! So far you have installed the operating system, configured monitoring, created a zpool for your data. You have also configured hourly, daily, weekly and monthly snapshots, so that you can rollback during workdays for example. Now it is time to configure the file server. Focus for now is fileshaing for Windows. We will use Jails to contain the file server. The containment is very useful because the jailed server acts on its own, has got its own IP address and FQDN and can not "escape" its confinement and taint the host. In case of a misconfiguration or something else that makes the jailed server unuseable, the host will not be affexted. This is very powerful!
Start with installing Samba:
ohlala# cd /usr/ports/sysutils/ezjail && make install cleanAdd ADS, ACL_SUPPORT, AIO_SUPPORT and DNSUPDATE.
Following dialogs:
tdb 1.2.9.1 - default
talloc 2.0.7 - default
cups-client 1.5.2_2 - default
openldap-client 2.4.31_1 - default
If you are not planning to use Active Directory as a central authentication source, you just have a few things left; install and configure a jailed Samba server.
(http://people.virginia.edu/~ll2bf/docs/nix/freebsd_jail.html, http://www.freebsd.org/doc/handbook/jails-build.html, http://erdgeist.org/arts/software/ezjail/)
Continue with installing EZJail:
ohlala# cd /usr/ports/sysutils/ezjail/
ohlala# make install clean
...and creating a filesystem for the jail template:
zfs create data/jailMy
/usr/local/etc/ezjail.conf:

ezjail_jaildir=/data/virt/jails
ezjail_jailtemplate=${ezjail_jaildir}/jailskel-template
ezjail_jailbase=${ezjail_jaildir}/jailbig-template
ezjail_sourcetree=/usr/src

# [email protected]:/home/ncvs
# ezjail_ftphost=ftp.freebsd.org

ezjail_default_execute="/usr/bin/login -f root"
ezjail_default_flavour=""
ezjail_archivedir="${ezjail_jaildir}/ezjail_archives"
ezjail_uglyperlhack="YES"
ezjail_mount_enable="YES"
ezjail_devfs_enable="YES"
ezjail_devfs_ruleset="devfsrules_jail"
ezjail_procfs_enable="YES"
ezjail_fdescfs_enable="YES"

# Setting this to YES will start to manage the basejail and newjail in ZFS ezjail_use_zfs="YES"
# The name of the ZFS ezjail should create jails on, it will be mounted at the ezjail_jaildir
ezjail_jailzfs="data/virt/jails"
# ADVANCED, be very careful!
ezjail_zfs_properties="-o compression=lzjb -o atime=off"
20120610, 20.50: Croatia scores!
Build a home server - take two, part 3.
I am going to use the hard disks serial number as label and later reuse it when creating the zpool. Start by listing your harddisks:
ohlala# ls -l /dev/ada*
crw-r-----  1 root  operator    0,  89 May 27 08:07 /dev/ada0
crw-r-----  1 root  operator    0,  91 May 27 08:07 /dev/ada1
crw-r-----  1 root  operator    0,  93 May 27 08:07 /dev/ada2
crw-r-----  1 root  operator    0, 101 May 27 08:07 /dev/ada2p1
crw-r-----  1 root  operator    0, 103 May 27 08:07 /dev/ada2p2
crw-r-----  1 root  operator    0, 105 May 27 08:07 /dev/ada2p3
crw-r-----  1 root  operator    0, 107 May 27 08:07 /dev/ada2p4
crw-r-----  1 root  operator    0, 109 May 27 08:07 /dev/ada2p5
crw-r-----  1 root  operator    0,  95 May 27 08:07 /dev/ada3
crw-r-----  1 root  operator    0, 111 May 27 08:07 /dev/ada3p1
crw-r-----  1 root  operator    0, 113 May 27 08:07 /dev/ada3p2
crw-r-----  1 root  operator    0, 115 May 27 08:07 /dev/ada3p3
crw-r-----  1 root  operator    0, 117 May 27 08:07 /dev/ada3p4
crw-r-----  1 root  operator    0, 119 May 27 08:07 /dev/ada3p5
crw-r-----  1 root  operator    0,  97 May 27 08:07 /dev/ada4
crw-r-----  1 root  operator    0,  99 May 27 08:07 /dev/ada5
ohlala#
And issue the command
/usr/local/sbin/smartctl -d auto -i /dev/adaX for every disk:ohlala# /usr/local/sbin/smartctl -d auto -i /dev/ada0
smartctl 5.42 2011-10-20 r3458 [FreeBSD 9.0-RELEASE amd64] (local build)
Copyright (C) 2002-11 by Bruce Allen, http://smartmontools.sourceforge.net
=== START OF INFORMATION SECTION ===
Model Family: Seagate Barracuda Green (Adv. Format)
Device Model: ST2000DL003-9VT166
Serial Number: 5YD7JNXT
LU WWN Device Id: 5 000c50 045645768
Firmware Version: CC3C
User Capacity: 2,000,398,934,016 bytes [2.00 TB]
Sector Sizes: 512 bytes logical, 4096 bytes physical
Device is: In smartctl database [for details use: -P show]
ATA Version is: 8
ATA Standard is: ATA-8-ACS revision 4
Local Time is: Sun May 27 09:36:06 2012 CEST
SMART support is: Available - device has SMART capability.
SMART support is: EnabledInitiliaze the disks:
ohlala#
ohlala# gpart create -s gpt ada0
ada0 created
ohlala# gpart create -s gpt ada1
ada1 created
ohlala# gpart create -s gpt ada4
ada4 created
ohlala# gpart create -s gpt ada5
ada5 created
Create ZFS partitions:
ohlala# gpart add -t freebsd-zfs -l 5YD7JNXT ada0
ada0p1 added
ohlala# gpart add -t freebsd-zfs -l 5YD7SM2A ada1
ada1p1 added
ohlala# gpart add -t freebsd-zfs -l 5YD7SMPJ ada4
ada4p1 added
ohlala# gpart add -t freebsd-zfs -l 5YD8AVDH ada5
ada5p1 added
ohlala# ls -l /dev/gpt
total 0
crw-r-----  1 root  operator    0, 138 May 27 10:30 5YD7JNXT
crw-r-----  1 root  operator    0, 162 May 27 10:32 5YD7SM2A
crw-r-----  1 root  operator    0, 166 May 27 10:33 5YD7SMPJ
crw-r-----  1 root  operator    0, 170 May 27 10:34 5YD8AVDH
crw-r-----  1 root  operator    0, 121 May 27 08:07 boot0
crw-r-----  1 root  operator    0, 132 May 27 08:07 boot1
crw-r-----  1 root  operator    0, 130 May 27 08:07 cache0
crw-r-----  1 root  operator    0, 141 May 27 08:07 cache1
crw-r-----  1 root  operator    0, 124 May 27 10:07 swap0
crw-r-----  1 root  operator    0, 135 May 27 08:07 swap1
crw-r-----  1 root  operator    0, 128 May 27 08:07 zil0
crw-r-----  1 root  operator    0, 139 May 27 08:07 zil1
ohlala#
Create the zpool
ohlala# zpool create data raidz /dev/gpt/5YD7JNXT /dev/gpt/5YD7SM2A /dev/gpt/5YD7SMPJ spare /dev/gpt/5YD8AVDH log mirror /dev/gpt/zil0 /dev/gpt/zil1 cache /dev/gpt/cache0 /dev/gpt/cache1
ohlala# zpool status
 pool: data
 state: ONLINE
 scan: none requested
config:

 NAME              STATE     READ WRITE CKSUM
 data              ONLINE       0     0     0
 raidz1-0        ONLINE       0     0     0
 gpt/5YD7JNXT  ONLINE       0     0     0
 gpt/5YD7SM2A  ONLINE       0     0     0
 gpt/5YD7SMPJ  ONLINE       0     0     0
 logs
 mirror-1        ONLINE       0     0     0
 gpt/zil0      ONLINE       0     0     0
 gpt/zil1      ONLINE       0     0     0
 cache
 gpt/cache0      ONLINE       0     0     0
 gpt/cache1      ONLINE       0     0     0
 spares
 gpt/5YD8AVDH    AVAIL

errors: No known data errors

 pool: zroot
 state: ONLINE
 scan: none requested
config:

 NAME        STATE     READ WRITE CKSUM
 zroot       ONLINE       0     0     0
 mirror-0  ONLINE       0     0     0
 ada2p3  ONLINE       0     0     0
 ada3p3  ONLINE       0     0     0

errors: No known data errors
ohlala#
ohlala# zfs set checksum=fletcher4 data
ohlala#
Configure backup and basic maintenance
It is a good thing to have some kind of backup of your work during workdays. We will set up hourly, daily, weekly and monthly snapshots that will be kept on the server. As many have told on their blogs; this is to be considered temporary. During workdays you can use the snapshots to roll back. But for long time storage you will have to replicate your work off-site. I'll come back to that.
It is also recommended that the pool is scrubbed regurarly. For consumer disks the recommended interval is once a week. We will configure that too.
The guide: http://www.neces.com/blog/technology/integrating-freebsd-zfs-and-periodic-snapshots-and-scrubs
As you can see from Ross' post, he uses ZFS in an enterprise environment. I'm using consumer disks so I will do weekly scrub instead. Start by installing zfs-periodic from /usr/ports/sysutils/zfs-periodic. My modifications:
ohlala# cd /usr/ports/sysutils/zfs-periodic/ohlala# make install clean
[root@ohlala /etc/periodic]# cp /usr/local/etc/periodic/monthly/998.zfs-scrub /usr/local/etc/periodic/weekly/998.zfs-scrubEdit
/usr/local/etc/periodic/weekly/998.zfs-scrub. Change"pools=$monthly_zfs_scrub_pools" to "pools=$weekly_zfs_scrub_pools"and
"case "$monthly_zfs_scrub_enable" in" to case ""$weekly_zfs_scrub_enable" in".ohlala# vi /usr/local/etc/periodic/weekly/998.zfs-scrubMy /etc/periodic.conf:
hourly_output="root"
hourly_show_success="NO"
hourly_show_info="YES"
hourly_show_badconfig="NO"
hourly_zfs_snapshot_enable="YES"
hourly_zfs_snapshot_pools="data"
hourly_zfs_snapshot_keep=10
daily_zfs_snapshot_enable="YES"
daily_zfs_snapshot_pools="data"
daily_zfs_snapshot_keep=7
# daily_status_zfs_enable="YES"
# daily_output="[email protected]"
daily_zfs_scrub_enable="YES"
daily_zfs_scrub_pools="data zroot"
weekly_zfs_snapshot_enable="YES"
weekly_zfs_snapshot_pools="data"
weekly_zfs_snapshot_keep=5
weekly_zfs_scrub_enable="YES"
weekly_zfs_scrub_pools="data zroot"
monthly_zfs_snapshot_enable="YES"
# monthly_zfs_scrub_enable="YES"
# monthly_zfs_scrub_pools="data zroot"
monthly_zfs_snapshot_pools="data"
monthly_zfs_snapshot_keep=2
Add
"[email protected]" to /etc/crontab.---
When the clock has passed full hour.
ohlala# zfs list -t snapshot
NAME                                    USED  AVAIL  REFER  MOUNTPOINT
data@hourly-2012-06-09-08                  0      -  41.3K  -
data/virt@hourly-2012-06-09-08             0      -  44.0K  -
data/virt/DC1@hourly-2012-06-09-08         0      -  40.0K  -
data/virt/OS@hourly-2012-06-09-08       170K      -  1.94G  -
data/virt/SERVER@hourly-2012-06-09-08      0      -  40.0K  -
ohlala#
A few hours later:
$ zfs list -t snapshot
NAME                                    USED  AVAIL  REFER  MOUNTPOINT
data@hourly-2012-06-09-08                  0      -  41.3K  -
data@hourly-2012-06-09-09                  0      -  41.3K  -
data@hourly-2012-06-09-10                  0      -  41.3K  -
data@hourly-2012-06-09-11                  0      -  41.3K  -
data@hourly-2012-06-09-12              24.0K      -  41.3K  -
data/virt@hourly-2012-06-09-08             0      -  44.0K  -
data/virt@hourly-2012-06-09-09             0      -  44.0K  -
data/virt@hourly-2012-06-09-10             0      -  45.3K  -
data/virt@hourly-2012-06-09-11             0      -  45.3K  -
data/virt@hourly-2012-06-09-12         42.0K      -   106K  -
data/virt/DC1@hourly-2012-06-09-08         0      -  40.0K  -
data/virt/DC1@hourly-2012-06-09-09         0      -  40.0K  -
data/virt/DC1@hourly-2012-06-09-10         0      -  39.0G  -
data/virt/DC1@hourly-2012-06-09-11         0      -  39.0G  -
data/virt/DC1@hourly-2012-06-09-12      169M      -  39.0G  -
data/virt/OS@hourly-2012-06-09-08       172K      -  1.94G  -
data/virt/OS@hourly-2012-06-09-09      24.0K      -  2.95G  -
data/virt/OS@hourly-2012-06-09-10          0      -  2.95G  -
data/virt/OS@hourly-2012-06-09-11          0      -  2.95G  -
data/virt/OS@hourly-2012-06-09-12      24.0K      -  2.95G  -
data/virt/SERVER@hourly-2012-06-09-08      0      -  40.0K  -
data/virt/SERVER@hourly-2012-06-09-09      0      -  40.0K  -
data/virt/SERVER@hourly-2012-06-09-10      0      -  40.0K  -
data/virt/SERVER@hourly-2012-06-09-11      0      -  40.0K  -
data/virt/SERVER@hourly-2012-06-09-12      0      -  40.0K  -
Eventually you will get a statusmail:
Removing stale files from /var/preserve:
Cleaning out old system announcements:
Removing stale files from /var/rwho:
Backup passwd and group files:
Verifying group file syntax:
/etc/group is fine

Backing up mail aliases:
Backing up package db directory:

Disk status:
Filesystem          Size    Used   Avail Capacity  Mounted on
zroot                15G    2.6G     13G    16%    /
devfs               1.0k    1.0k      0B   100%    /dev
data                3.6T     41k    3.6T     0%    /data
data/virt           3.6T     44k    3.6T     0%    /data/virt
data/virt/DC1       3.6T     40k    3.6T     0%    /data/virt/DC1
data/virt/OS        3.6T      3G    3.6T     0%    /data/virt/OS
data/virt/SERVER    3.6T     40k    3.6T     0%    /data/virt/SERVER

Last dump(s) done (Dump '>' file systems):

Checking status of zfs pools:
all pools are healthy

Network interface status:
Name    Mtu Network       Address              Ipkts Ierrs Idrop    Opkts Oerrs  Coll
usbus     0 <Link#1>                               0     0     0        0     0     0
re0    1500 <Link#2>      15:da:e9:bd:b5:8f     3715     0     0     2622     0     0
re0    1500 192.168.1.0   ohlala                3653     -     -     2565     -     -
re0    1500 fe80::16da:e9 fe80::16da:e9ff:f        0     -     -        1     -     -
usbus     0 <Link#3>                               0     0     0        0     0     0
usbus     0 <Link#4>                               0     0     0        0     0     0
lo0   16384 <Link#5>                               0     0     0        0     0     0
lo0   16384 localhost     ::1                      0     -     -        0     -     -
lo0   16384 fe80::1%lo0   fe80::1                  0     -     -        0     -     -
lo0   16384 your-net      localhost                0     -     -        0     -     -

Local system status:
 9:05AM  up 53 mins, 2 users, load averages: 0.00, 0.00, 0.00

Mail in local queue:
mailq: Mail queue is empty

Mail in submit queue:
mailq: Mail queue is empty

Security check:
    (output mailed separately)

Checking for rejected mail hosts:

Checking for denied zone transfers (AXFR and IXFR):

Doing zfs daily snapshots:
taking snapshot, data@daily-2012-06-17

Doing zfs scrubs:
starting scrub on data
  pool: data
 state: ONLINE
 scan: scrub repaired 0 in 0h0m with 0 errors on Sun Jun 17 09:05:30 2012
config:

NAME              STATE     READ WRITE CKSUM
data              ONLINE       0     0     0
  raidz1-0        ONLINE       0     0     0
    gpt/5YD7JNXT  ONLINE       0     0     0
    gpt/5YD7SM2A  ONLINE       0     0     0
    gpt/5YD7SMPJ  ONLINE       0     0     0
logs
  mirror-1        ONLINE       0     0     0
    gpt/zil0      ONLINE       0     0     0
    gpt/zil1      ONLINE       0     0     0
cache
  gpt/cache0      ONLINE       0     0     0
  gpt/cache1      ONLINE       0     0     0
spares
  gpt/5YD8AVDH    AVAIL

errors: No known data errors
starting scrub on zroot
  pool: zroot
 state: ONLINE
 scan: scrub repaired 0 in 0h0m with 0 errors on Sun Jun 17 09:06:38 2012
config:

NAME        STATE     READ WRITE CKSUM
zroot       ONLINE       0     0     0
  mirror-0  ONLINE       0     0     0
    ada1p3  ONLINE       0     0     0
    ada2p3  ONLINE       0     0     0

errors: No known data errors

-- End of daily output --Build a home server - take two, part 2.
ohlala# freebsd-update fetch
ohlala# freebsd-update install
Basic monitoring
We are going to use Smartmontools and we want to be informed by email when something happens with the harddisks. The default MTA installed is Sendmail. But it is far to big for our purpose, so we replace it with sSMTP:
Goto http://www.freebsd.org/ports/ and search for ssmtp. Here you get information about where sSMTP is situated in the /user/ports directory. Simply cd into that directory and start the installer.
ohlala# cd /usr/ports/mail/ssmtp/
 ohlala# make install replace clean
ohlala# mv /usr/local/etc/ssmtp/ssmtp.conf.sample /usr/local/etc/ssmtp/ssmtp.conf
 ohlala# mv /usr/local/etc/ssmtp/revaliases.sample  /usr/local/etc/ssmtp/revaliases
ohlala# vi /usr/local/etc/ssmtp/ssmtp.confohlala# vi /usr/local/etc/ssmtp/revaliasesCheck drdata.blogg.se/2012/april/build-a-home-server-part-4.html for details.
Continue with installing Smartmontools:
Again search http://www.freebsd.org/ports/ for the location of Smartmontools in the /usr/ports directory and simply install by typing
make install clean.List your available harddisks. Here you can see the designations for the data disks:
ohlala# ls -l /dev/ada*
crw-r-----  1 root  operator    0,  89 May 27 08:07 /dev/ada0 crw-r-----  1 root  operator    0,  91 May 27 08:07 /dev/ada1 crw-r-----  1 root  operator    0,  93 May 27 08:07 /dev/ada2 crw-r-----  1 root  operator    0, 101 May 27 08:07 /dev/ada2p1 crw-r-----  1 root  operator    0, 103 May 27 08:07 /dev/ada2p2 crw-r-----  1 root  operator    0, 105 May 27 08:07 /dev/ada2p3 crw-r-----  1 root  operator    0, 107 May 27 08:07 /dev/ada2p4 crw-r-----  1 root  operator    0, 109 May 27 08:07 /dev/ada2p5 crw-r-----  1 root  operator    0,  95 May 27 08:07 /dev/ada3 crw-r-----  1 root  operator    0, 111 May 27 08:07 /dev/ada3p1 crw-r-----  1 root  operator    0, 113 May 27 08:07 /dev/ada3p2 crw-r-----  1 root  operator    0, 115 May 27 08:07 /dev/ada3p3 crw-r-----  1 root  operator    0, 117 May 27 08:07 /dev/ada3p4 crw-r-----  1 root  operator    0, 119 May 27 08:07 /dev/ada3p5 crw-r-----  1 root  operator    0,  97 May 27 08:07 /dev/ada4 crw-r-----  1 root  operator    0,  99 May 27 08:07 /dev/ada5
 ohlala#

 ohlala# cp /usr/local/etc/smartd.conf.sample /usr/local/etc/smartd.conf
ohlala# vi /usr/local/etc/smartd.conf

# The word DEVICESCAN will cause any remaining lines in this
# configuration file to be ignored: it tells smartd to scan for all
# ATA and SCSI devices.  DEVICESCAN may be followed by any of the
# Directives listed below, which will be applied to all devices that
# are found.  Most users should comment out DEVICESCAN and explicitly
# list the devices that they wish to monitor.
#DEVICESCAN

/dev/ada0 -m [email protected] -M test

/dev/ada0 -a -d auto -o on -S on -s (S/../.././02|L/../../6/03) -m [email protected]
 /dev/ada1 -a -d auto -o on -S on -s (S/../.././02|L/../../6/03) -m [email protected]
/dev/ada2 -a -d auto -o on -S on -s (S/../.././02|L/../../6/03) -m [email protected]
 /dev/ada3 -a -d auto -o on -S on -s (S/../.././02|L/../../6/03) -m [email protected]
/dev/ada4 -a -d auto -o on -S on -s (S/../.././02|L/../../6/03) -m [email protected]
 /dev/ada5 -a -d auto -o on -S on -s (S/../.././02|L/../../6/03) -m [email protected]
ohlala# echo 'smartd_enable="YES"' >> /etc/rc.conf
ohlala# /usr/local/etc/rc.d/smartd start
Starting smartd.
(pass1:siisch1:0:0:0): SMART. ACB: b0 db 00 4f c2 40 00 00 00 00 f8 00
(pass1:siisch1:0:0:0): CAM status: ATA Status Error
(pass1:siisch1:0:0:0): ATA status: 51 (DRDY SERV ERR), error: 04 (ABRT )
(pass1:siisch1:0:0:0): RES: 51 04 00 4f c2 40 00 00 00 f8 00
(pass2:ahcich0:0:0:0): SMART. ACB: b0 db 00 4f c2 40 00 00 00 00 f8 00
(pass2:ahcich0:0:0:0): CAM status: ATA Status Error
(pass2:ahcich0:0:0:0): ATA status: 51 (DRDY SERV ERR), error: 04 (ABRT )
(pass2:ahcich0:0:0:0): RES: 51 04 00 4f c2 40 00 00 00 f8 0
ohlala#
Part 3 - Configure the zpool.
Build a home server - take two, part 1.
I have two 60 GB SSD disks. So far, after having installed OS, VirtualBox and other applications, I have used 3,5 GB on root. My guess is that when completed I will have used up cirka 4 GB on root. It seems kind of hefty to dedicate two 60 GB quite expensive SSD disks and not fully use them. And I really want to take advantage of the nifty features ZIL and L2ARC...
You do not have to dedicate whole disks to ZFS. But if you do, ZFS uses the disks cache. That is of course an advantage. ZFS can also use partitions, which I will use to fully utilize the SSD disks.
Follow this (among many) guide to create a ZFS root mirror: http://www.freebsdwiki.net/index.php/ZFS,_booting_from. The only thing I did different was partitioning:
# gpart add -b 34 -s 128 -t freebsd-boot -l boot0 ada0 # gpart add -s 12288M -t freebsd-swap -l swap0 ada0 # gpart add -s 16G -t freebsd-zfs -l root0 ada0 # gpart add -s 4096M -t freebsd-zfs -l zil0 ada0 # gpart add -t freebsd-zfs -l cache0 ada0 |
[root@ohlala ~]# gpart show |
/etc/fstab:
 /dev/gpt/swap0  none    swap    sw      0       0
 /dev/gpt/swap1  none    swap    sw      0       0
After reboot you should have an output similar to this:
[root@ohlala ~]# df -h
Filesystem          Size    Used   Avail Capacity  Mounted on
zroot                12G    345M     12G     3%    /
devfs               1.0k    1.0k      0B   100%    /dev
zroot/home           12G     46M     12G     0%    /home
zroot/tmp            12G     55k     12G     0%    /tmp
zroot/usr            15G    3.1G     12G    20%    /usr
zroot/var            12G     97M     12G     1%    /var
[root@ohlala ~]#
Part 2 - Configure basic monitoring.
Build a home server - part 8
I got it all to work; softwareRAID, LVM and Flashcache. Proven, stable techniques. But when I realize that a snapshot in LVM takes the same amount of disk space as the source... It will not work on a home server with, say, one or more 1 TB file systems. The techniques are good. No dought about it. But they have also grown old. I have to abandon this approach.
The end.
Build a home server - part 7
root@ohlala:~# cd /usr/src/
root@ohlala:/usr/src# git clone git://anonscm.debian.org/collab-maint/flashcache.git
Cloning into 'flashcache'...
root@ohlala:/usr/src# cd flashcache/
root@ohlala:/usr/src/flashcache# make
root@ohlala:/usr/src/flashcache# make clean
root@ohlala:/usr/src/flashcache# make install
root@ohlala:/usr/src/flashcache# make -f Makefile.dkms boot_conf

root@ohlala:/usr/src/flashcache# vi /etc/sysctl.conf
Add
#####################
# Flashcache settings
#####################
#
# Using Writethrough
#

# (All modes) Global caching mode to cache everything
dev.flashcache.md1+data-ftest.cache_all = 1

# (All modes) Change the reclaim policy to LRU from FIFO
dev.flashcache.md1+data-ftest.reclaim_policy = 1
Enable Flashcache (please check Robert Vojcik's blogg)
Edit /etc/default/flashcache:#
# FlashCache Configuration#
# FlashCache configured ?
FLASH_CACHE_START=YES
# FlashCache binaries
FLASH_CACHE_BIN=/sbin
# New Flashcache device
FLASH_CACHE_DEV=fcache
# Original data device
DATA_DEV=/dev/mapper/data-ftest
# Cache device - Fast disk / SSD
CACHE_DEV=/dev/md1
# block size
BLOCK_SIZE=4k
# cache type (-p back|around|thru)
CACHE_TYPE=thru
Edit /etc/init/flashcache-init. Do not forget to chmod a+x /etc/init.d/flashcache-init.
#!/bin/bash
### BEGIN INIT INFO
# Provides: flashcache-init
# Required-Start:
# Required-Stop:
# Default-Start: S
# Default-Stop: 0 6
# Short-Description: Prepare flashcache device during boot time
# Description: Create flashcache device during boot
### END INIT INFO
# debian lenny
# update-rc.d flashcache-init start 27 S . stop 45 0 6 .
# Load Configuration
. /etc/default/flashcache
export PATH=$PATH:$FLASH_CACHE_BIN:/usr/bin:/usr/sbin/
function do_start {
if ! [[ "$FLASH_CACHE_START" = "YES" ]] ; then
echo " --- Flashcache not configured or turned off"
exit 0
fi
echo " --- Starting FlashCache"
echo -n " --- Loading kernel module..."
if modprobe flashcache ; then
echo "OK"
else
echo "FAILED"
exit 1
fi
if [[ "$CACHE_TYPE" == "back" ]] ; then
echo " --- Trying to load FlashCache - $CACHE_TYPE"
if flashcache_load $CACHE_DEV; then
echo " --- Loading FlashCache OK - $CACHE_TYPE"
else
echo " --- ERROR: Problem during FlashCache loading"
exit 1
fi
fi
if [[ "$CACHE_TYPE" == "thru" ]] ; then
echo " --- Trying to initialize FlashCache, type: $CACHE_TYPE"
if flashcache_create -v -p $CACHE_TYPE -b $BLOCK_SIZE $FLASH_CACHE_DEV $
CACHE_DEV $DATA_DEV; then
echo " --- Initializing FlashCache OK, type: $CACHE_TYPE"
else
echo " --- ERROR: Problem during FlashCache initialization - typ
e: $CACHE_TYPE"
exit 1
fi
fi
if [[ "$CACHE_TYPE" = "around" ]] ; then
echo " --- Trying to initialize FlashCache, type: $CACHE_TYPE"
if flashcache_create -v -p $CACHE_TYPE -b $BLOCK_SIZE $FLASH_CACHE_DEV $
CACHE_DEV $DATA_DEV; then
echo " --- Initializing FlashCache OK, type: $CACHE_TYPE"
else
echo " --- ERROR: Problem during FlashCache initialization, type
: $CACHE_TYPE"
exit 1
fi
fi
}
function do_stop {
echo " --- Stopping FlashCache."
if dmsetup remove $FLASH_CACHE_DEV ; then
echo " --- Successfully removed."
exit
else
echo " --- ERROR: Some problems during remove."
exit 1
fi
}
case "$1" in
"start")
do_start
;;
"stop")
do_stop
;;
*)
cat << EOF
Initialization script for FlashCache
Usage: $0 <start|stop>
EOF
exit 1
;;
esacEdit
/etc/rc.local:
#
# mount the cached file system
#
echo "\n *** Mounting cached filesystem /ftest (/etc/rc.local) ***"
mount -v -t ext4 -O user_xattr,nobarriers /dev/mapper/fcache /ftest
Edit
/etc/fstab to make a note about your cached file system/dev/mapper/fcache /ftest ext4 noauto,user_xattr,nobarrier 0 2Done!
Part 8 - Configure LVM for snapshots.
Build a home server - part 6
We need a physical device to tie to volume group:
root@ohlala:~# ls /dev/md*
/dev/md0  /dev/md1  /dev/md2

/dev/md:
0  1  2

root@ohlala:~# pvcreate /dev/md2
 Physical volume "/dev/md2" successfully created
Create a Volume Group:
root@ohlala:~# vgcreate --verbose data /dev/md2
 Wiping cache of LVM-capable devices
 Wiping cache of LVM-capable devices
 Adding physical volume '/dev/md2' to volume group 'data'
 Creating directory "/etc/lvm/archive"
 Archiving volume group "data" metadata (seqno 0).
 Creating directory "/etc/lvm/backup"
 Creating volume group backup "/etc/lvm/backup/data" (seqno 1).
 Volume group "data" successfully created
root@ohlala:~#
Create a logical volume for testing Flashcache:
root@ohlala:~# lvcreate --verbose -L 100G --name ftest data
 Setting logging type to disk
 Finding volume group "data"
 Archiving volume group "data" metadata (seqno 1).
 Creating logical volume ftest
 Creating volume group backup "/etc/lvm/backup/data" (seqno 2).
 Found volume group "data"
 Creating data-ftest
 Loading data-ftest table (252:0)
 Resuming data-ftest (252:0)
 Clearing start of logical volume "ftest"
 Creating volume group backup "/etc/lvm/backup/data" (seqno 2).
 Logical volume "ftest" created
Format the Logical Volume:
root@ohlala:~# mkfs.ext4 -b 4096 -E stride=64,stripe-width=128 /dev/mapper/data-ftestPart 7 - Configure Flashcache
Build a home server - part 5
root@ohlala:~# mdadm --verbose --create /dev/md1 --level=1 --raid-devices=2 /dev/sdb4 /dev/sdd4
mdadm: Note: this array has metadata at the start and
 may not be suitable as a boot device.  If you plan to
 store '/boot' on this device please ensure that
 your boot-loader understands md/v1.x metadata, or use
 --metadata=0.90
mdadm: size set to 40751284K
Continue creating array? y
mdadm: Defaulting to version 1.2 metadata
mdadm: array /dev/md1 started.
root@ohlala:~#
Check the progress.
watch -d cat /proc/mdstat:
Every 2.0s: cat /proc/mdstat                            Sun Apr 29 09:35:03 2012

Personalities : [linear] [multipath] [raid0] [raid1] [raid6] [raid5] [raid4] [raid10]
md1 : active raid1 sdd4[1] sdb4[0]
 40751284 blocks super 1.2 [2/2] [UU]
 [>....................]  resync =  0.8% (342656/40751284) finish=7.8min speed=85664K/sec

md0 : active raid1 sdd2[1] sdb2[0]
 9764529 blocks super 1.2 [2/2] [UU]

unused devices: <none>
When the synchronization is ready add the array to /etc/mdadm/mdadm.conf by typing:
mdadm --detail --scan >> /etc/mdadm/mdadm.confEdit /etc/mdadm/mdadm.conf and put your mailaddress. Also comment out old arrays:
# mdadm.conf
#
# Please refer to mdadm.conf(5) for information about this file.
#

# by default (built-in), scan all partitions (/proc/partitions) and all
# containers for MD superblocks. alternatively, specify devices to scan, using
# wildcards if desired.
#DEVICE partitions containers

# auto-create devices with Debian standard permissions
CREATE owner=root group=disk mode=0660 auto=yes

# automatically tag new arrays as belonging to the local system
HOMEHOST <system>

# instruct the monitoring daemon where to send mail alerts
MAILADDR [email protected]

# definitions of existing MD arrays
#ARRAY /dev/md/0 metadata=1.2 UUID=ae2235f0:110a54e7:6540e885:863f829b name=ohlala:0

# This file was auto-generated on Sun, 29 Apr 2012 08:54:32 +0200
# by mkconf $Id$
ARRAY /dev/md/0 metadata=1.2 name=ohlala:0 UUID=ae2235f0:110a54e7:6540e885:863f829b
ARRAY /dev/md/1 metadata=1.2 name=ohlala:1 UUID=0e8cb4ce:a09d1148:5b289d1b:9ae61d2b
After reboot cat /proc/mdstat. If you get an ouput similar to this below try
mdadm --stop /dev/md127, mdadm --assemble /dev/md1 and update-initramfs -u. Reboot and check again.md127 : active (auto-read-only) raid1 sdd4[1] sdb4[0]
40751284 blocks super 1.2 [2/2] [UU]Create the data array
Create new partitions on the data disks. Type is Linux RAID (fd00)
root@ohlala:~# gdisk /dev/sdc
GPT fdisk (gdisk) version 0.8.1

Partition table scan:
 MBR: protective
 BSD: not present
 APM: not present
 GPT: present

Found valid GPT with protective MBR; using GPT.

Command (? for help): n
Partition number (1-128, default 1):
First sector (34-3907029134, default = 34) or {+-}size{KMGTP}:
Information: Moved requested sector from 34 to 2048 in
order to align on 2048-sector boundaries.
Use 'l' on the experts' menu to adjust alignment
Last sector (2048-3907029134, default = 3907029134) or {+-}size{KMGTP}:
Current type is 'Linux filesystem'
Hex code or GUID (L to show codes, Enter = 8300): fd00
Changed type of partition to 'Linux RAID'

Command (? for help): w

Final checks complete. About to write GPT data. THIS WILL OVERWRITE EXISTING
PARTITIONS!!

Do you want to proceed? (Y/N): Y
OK; writing new GUID partition table (GPT).
The operation has completed successfully.
root@ohlala:~#
And create the array:
root@ohlala:~# ls -al /dev/disk/by-id/drwxr-xr-x 2 root root 880 Sep 23 08:09 .
drwxr-xr-x 8 root root 160 Sep 23 08:05 ..
lrwxrwxrwx 1 root root 9 Sep 23 08:08 ata-ST2000DL003-9VT166_5YD7JNXT -> ../../sdf
lrwxrwxrwx 1 root root 10 Sep 23 08:08 ata-ST2000DL003-9VT166_5YD7JNXT-part1 -> ../../sdf1
lrwxrwxrwx 1 root root 9 Sep 23 08:07 ata-ST2000DL003-9VT166_5YD7SM2A -> ../../sdc
lrwxrwxrwx 1 root root 10 Sep 23 08:07 ata-ST2000DL003-9VT166_5YD7SM2A-part1 -> ../../sdc1
lrwxrwxrwx 1 root root 9 Sep 23 08:07 ata-ST2000DL003-9VT166_5YD7SMPJ -> ../../sdd
lrwxrwxrwx 1 root root 10 Sep 23 08:07 ata-ST2000DL003-9VT166_5YD7SMPJ-part1 -> ../../sdd1
lrwxrwxrwx 1 root root 9 Sep 23 08:06 ata-ST2000DL003-9VT166_5YD8AVDH -> ../../sda
lrwxrwxrwx 1 root root 10 Sep 23 08:05 ata-ST2000DL003-9VT166_5YD8AVDH-part1 -> ../../sda1
lrwxrwxrwx 1 root root 9 Sep 23 08:09 ata-ST2000DL003-9VT166_5YD9XR2F -> ../../sdh
lrwxrwxrwx 1 root root 10 Sep 23 08:09 ata-ST2000DL003-9VT166_5YD9XR2F-part1 -> ../../sdh1
lrwxrwxrwx 1 root root 9 Sep 23 08:06 ata-ST2000DL003-9VT166_5YDA0P1H -> ../../sdb
lrwxrwxrwx 1 root root 10 Sep 23 08:06 ata-ST2000DL003-9VT166_5YDA0P1H-part1 -> ../../sdb1
root@ohlala:~#mdadm --verbose --create /dev/md2 --chunk=256 --level=5 --raid-devices=3 /dev/sda1 /dev/sdc1 /dev/sde1 --spare-devices=1 /dev/sdf1
It may not succeed:
root@ohlala:~# mdadm --verbose --create /dev/md2 --chunk=256 --level=5 --raid-devices=3 /dev/sda1 /dev/sdc1 /dev/sde1 --spare-devices=1 /dev/sdf1
mdadm: layout defaults to left-symmetric
mdadm: layout defaults to left-symmetric
mdadm: layout defaults to left-symmetric
mdadm: layout defaults to left-symmetric
mdadm: layout defaults to left-symmetric
mdadm: size set to 1953512192K
mdadm: Defaulting to version 1.2 metadata
mdadm: ADD_NEW_DISK for /dev/sda1 failed: Device or resource busy
root@ohlala:~#
but cat /proc/mdstat shows that something is going on. Try to add missing disks.
md2 : active raid5 sdc1[1] sda1[0]
3907024384 blocks super 1.2 level 5, 256k chunk, algorithm 2 [3/2] [UU_]
root@ohlala:~# mdadm --add /dev/md2 /dev/sde1
mdadm: added /dev/sde1
root@ohlala:~# mdadm --add /dev/md2 /dev/sdf1
mdadm: added /dev/sdf1
root@ohlala:~#
And the rebuilding starts (watch it by typing watch -d cat /proc/mdstat);
Every 2.0s: cat /proc/mdstat Sun Apr 29 10:22:09 2012
Personalities : [linear] [multipath] [raid0] [raid1] [raid6] [raid5] [raid4] [raid10]
md2 : active raid5 sdf1[4](S) sde1[3] sdc1[1] sda1[0]
3907024384 blocks super 1.2 level 5, 256k chunk, algorithm 2 [3/2] [UU_]
[>....................] recovery = 0.1% (2641812/1953512192) finish=927.3min speed=35059K/sec
md0 : active raid1 sdd2[1] sdb2[0]
9764529 blocks super 1.2 [2/2] [UU]
md1 : active raid1 sdd4[1] sdb4[0]
40751284 blocks super 1.2 [2/2] [UU]
unused devices: <none>
As soon as rebuildning is done.
root@ohlala:~# mdadm --detail --scan >> /etc/mdadm/mdadm.conf
root@ohlala:~# update-initramfs -u
While the data array is scrubbing we continue with setting up LVM.
Part 6 - Set up LVM
Build a home server - part 4
apt-get install git build-essential dkms linux-headers-`uname -r` bridge-utils virt-manager acpid smartmontools drbd8-utils gdisk sysstat lvm2 xorg pm-utils ssmtpConfigure Smartmontools
Start by edit /etc/default/smartmontools. Just uncomment the line
"#start_smartd=yes". Continue with editing /etc//smartd.conf. I want to be informed by e-mail, so first I configured ssmtp. My ISP requires only valid mailaccounts. Start by edit /etc/ssmtp/ssmtp.conf:#
# Config file for sSMTP sendmail
#
# The person who gets all mail for userids < 1000
# Make this empty to disable rewriting.
root=[email protected]
# The place where the mail goes. The actual machine name is required no
# MX records are consulted. Commonly mailhosts are named mail.domain.com
mailhub=mailout.YourISP.org
# Where will the mail seem to come from?
rewriteDomain=YourISP.com
# The full hostname
hostname=ohlala.vusir.local
# Are users allowed to set their own From: address?
# YES - Allow the user to specify their own From: address
# NO - Use the system generated From: address
FromLineOverride=YESEdit /etc/ssmtp/revaliases:
# sSMTP aliases
#
# Format:       local_account:outgoing_address:mailhub
#
# Example: root:[email protected]:mailhub.your.domain[:port]
# where [:port] is an optional port number that defaults to 25.
root:[email protected]:mailout.YourISP.org
Test your setting:
echo test | mail -s "testing ssmtp setup" [email protected]List the devices you want to monitor:
root@ohlala:~# ls -l /dev/disk/by-id/
total 0
lrwxrwxrwx 1 root root  9 Apr 28 07:43 lrwxrwxrwx 1 root root   9 Sep 23 06:41 ata-ST2000DL003-9VT166_5YD7JNXT -> ../../sdf
lrwxrwxrwx 1 root root   9 Sep 23 06:41 ata-ST2000DL003-9VT166_5YD7SM2A -> ../../sdc
lrwxrwxrwx 1 root root   9 Sep 23 06:41 ata-ST2000DL003-9VT166_5YD7SMPJ -> ../../sdd
lrwxrwxrwx 1 root root   9 Sep 23 06:41 ata-ST2000DL003-9VT166_5YD8AVDH -> ../../sda
lrwxrwxrwx 1 root root   9 Sep 23 06:41 ata-ST2000DL003-9VT166_5YD9XR2F -> ../../sdh
lrwxrwxrwx 1 root root   9 Sep 23 06:41 ata-ST2000DL003-9VT166_5YDA0P1H -> ../../sdb
l
root@ohlala:~#
My /etc//smartd.conf:
/dev/disk/by-id/ata-ST2000DL003-9VT166_5YD7JNXT -m [email protected] -M exec /usr/share/smartmontools/smartd-runner

/dev/disk/by-id/ata-ST2000DL003-9VT166_5YD7JNXT -a -d sat -o on -S on -s (S/../.././02|L/../../6/03) -m [email protected] -M exec /usr/share/smartmontools/smartd-runner
/dev/disk/by-id/ata-ST2000DL003-9VT166_5YD7SMPJ -a -d sat -o on -S on -s (S/../.././02|L/../../6/03) -m [email protected] -M exec /usr/share/smartmontools/smartd-runner
/dev/disk/by-id/ata-ST2000DL003-9VT166_5YD8AVDH -a -d sat -o on -S on -s (S/../.././02|L/../../6/03) -m [email protected] -M exec /usr/share/smartmontools/smartd-runner
/dev/disk/by-id/ata-ST2000DL003-9VT166_5YD9VCKA -a -d sat -o on -S on -s (S/../.././02|L/../../6/03) -m [email protected] -M exec /usr/share/smartmontools/smartd-runner
/dev/disk/by-id/ata-ST2000DL003-9VT166_5YD9XR2F -a -d sat -o on -S on -s (S/../.././02|L/../../6/03) -m [email protected] -M exec /usr/share/smartmontools/smartd-runner
/dev/disk/by-id/ata-ST2000DL003-9VT166_5YDA0P1H -a -d sat -o on -S on -s (S/../.././02|L/../../6/03) -m [email protected] -M exec /usr/share/smartmontools/smartd-runner
Start smartmontools:
/etc/init.d/smartmontools startThe first line in /etc/smartd.conf is just sending a testmail when smartmontools starts.
Still Saturday. Turning off the server and do other fun stuff!
Part 5 - Create Flashcache and data arrays
Build a home server - part 3
Aah! Saturday morning and everyone are asleep. A perfect time to spoil a perfect morning with doing the boring stuff. It is time to enumarate the hard disks and set up monitoring. Bad times will arrive. Disks are going bad at some point. It is important that you know which disk to replace.
- Shutdown the server and remove the SATA cables attached to the data disks.
- Power up and log on to the server as root. List the devices. You will get an out similar to this:
root@ohlala:~# ls -l /dev/disk/by-path/
total 0
lrwxrwxrwx 1 root root  9 Apr 28 05:51 pci-0000:00:1f.2-scsi-5:0:0:0 -> ../../sda
lrwxrwxrwx 1 root root  9 Apr 28 05:51 pci-0000:01:00.0-scsi-0:0:0:0 -> ../../sdb
root@ohlala:~# ls -l /dev/disk/by-id/
total 0
lrwxrwxrwx 1 root root  9 Apr 28 05:51 ata-INTEL_SSDSC2CW060A3_CVCV1534059E060AGN -> ../../sdb
lrwxrwxrwx 1 root root  9 Apr 28 05:51 ata-TEAM_XS1_SSD_TEAM-2SA110214008 -> ../../sda
root@ohlala:~#- Mark. Power off. Attach a another SATA cable. Boot. List. Repeat.
- And no. This is not fun!
A listing with one of the data disks attached:
root@ohlala:~# ls -l /dev/disk/by-path/
total 0
lrwxrwxrwx 1 root root  9 Apr 28 06:39 pci-0000:00:1f.2-scsi-0:0:0:0 -> ../../sda
lrwxrwxrwx 1 root root  9 Apr 28 06:39 pci-0000:00:1f.2-scsi-5:0:0:0 -> ../../sdb
lrwxrwxrwx 1 root root  9 Apr 28 06:39 pci-0000:01:00.0-scsi-0:0:0:0 -> ../../sdc
root@ohlala:~# ls -l /dev/disk/by-id/
total 0
lrwxrwxrwx 1 root root  9 Apr 28 06:39 ata-INTEL_SSDSC2CW060A3_CVCV1534059E060AGN -> ../../sdc
lrwxrwxrwx 1 root root  9 Apr 28 06:39 ata-ST2000DL003-9VT166_5YD7JNXT -> ../../sda
lrwxrwxrwx 1 root root  9 Apr 28 06:39 ata-TEAM_XS1_SSD_TEAM-2SA110214008 -> ../../sdb
lrwxrwxrwx 1 root root  9 Apr 28 06:39 md-name-ohlala:0 -> ../../md0
root@ohlala:~#
Note the highlighted parts and how the paths have changed after a new disk has been attached. This is important to know and remember: the path /dev/sdX will change.
Update OS
apt-get update && apt-get upgrade
Part 4 - Configure basic monitoring.
Build a home server - part 2
The hardware is now assembled and it is time to install an operating system. My choice is Ubuntu and the only reason is that I am used to it. As version 12.04 was about to be released I started with the beta. Worked fine!
I am using the two 60 GB SSD disks as mirrored root. I partitioned the disks as follows:
gdisk /dev/sdd:
| Number | Start (sector) | End (sector) | Size | Code | Name | |
| 1 | 34 | 195346 | 95.4 MiB | EF00 | EFI_boot | |
| 2 | 195347 | 19726597 | 9.3 GiB | FD00 | ||
| 3 | 19728384 | 36505599 | 8.0 GiB | 8200 | ||
| 4 | 36505600 | 117229567 | 38.5 GiB | FD00 | ||
The motherboard supports EFI, so partition 1 is formatted for EFI boot.
Partition 2 is a RAID partition.
Partition 3 is a swap partition
Partition 4 is a RAID partition for the future Flashcache block device.
OS installation is pretty straight forward. Create a RAID 1 array (/dev/md0) from partition 2 of the two disks and use it for the root partition. Later during installation I just chose to install OpenSSH server, so that I can sit in my sofa and do the remaining configuration.
Post OS installation task:
sudo passwd rootPart 3 - Post OS installation tasks
Build a home server - part 1
Preface
So, you are in the need of a new server? This blogg will not help you with choosing the right hardware but propose to you a perfectly viable solution for a SOHO-server. The concept is not constricted to the small wallet but is expandable to your needs and choice.
When I embarked this journey I only had a few things in mind that I wanted to accomplish:
- Buy me a new, more silent home server.
- Install an Active Directory 2008 R2.
- Install a file server (Linux) that presents a shared resources with NFSv4 and CIFS using AD as the authentication source.
Instead of just these three quite simple goals this evolved beyond my imagination. I soon realised that I have to configure a virtualization host, learn more about the inner workings of Linux, software RAID, LVM and so on... Great fun though!
I did also realize that this configuration is a perfect server solution for the small business. If you are about to deploy a new server for your business or even looking for a solution to productify and support, this might be just what you are looking for. One thing, if you are using this, private or in business, please post a "I used this!" and with a few words tell us your plans here. I would appreciate it. A lot.
And a special thank you to all of you open source wizards that have taken time to program, realize and make all the great software publically available. I am mighty impressed of your work! Thank you.
Being a leacher for years it is now time for me to contribute to the common. I hope you find this blogg useful. This recepie is a compilation from various resources on the Internet.
Hardware
I am not amused with choosing hardware. I find it quite boring, so imagine my surprise when I realized that this part actually was fun. This was also the first time I ever built myself a computer. I searched the Internet for advice on choosing hardware and found Thomas Jansson's blogg. I ripped his setup but chose a cheaper motherboard because the one I wanted was out of stock and a less powerful CPU but more RAM. In retrospective I would follow his advice and buy a new, more silent CPU fan. If you are building a server for a small office, consider a chassi that has room for hot swapping hard drives.
My setup:
| Hard disk: | SEAGATE BARRACUDA GREEN 2TB 5900RPM SATA/600 64MB | x4 | ||||
| Chassis: | LIAN LI PC-Q08B BLACK ALU MINI-ITX NO PSU | |||||
| Memory: | KINGSTON DDR3 HYPERX 8GB 1600MHZ CL9 (2X4GB) | |||||
| CPU: | INTEL CORE I5 2400 3.10GHZ 6MB S-1155 | |||||
| PSU: | COOLER MASTER SILENT PRO M ATX12V 2.3 500W | |||||
| Motherboard: | ASUS P8H61-I B3 H61 S-1155 MINI-ITX | |||||
| SATA card: | Silicon Image, Inc. SiI 3132 Serial ATA Raid II Controller | |||||
| SSD: |
60 GB |
x2 |
One of the 2 TB disks and one of the SSD disks are attached to the SATA card.
Software
There were certain techniques I wanted to learn more about; software RAID, LVM and DRBD. During my searches I also found Facebook/Flashcahe and later on I found Arno Tölls et al version for Debian. I already had a 60 GB SSD disk in my laptop which I immediately janked out. More thinking rendered buying one more, so that I could create a mirrored root and Flashcache. By now you understand that the choice of operating system was Linux and the Ubuntu distribution version 12.04.
More ideas, more software
I am a Windows Systems Administrator by trade and Active Directory is my primary experties. One goal with this server is to install and configure an Active Directory and a Linux file server presenting resources with Samba and NFSv4 using Kerberos for authentication. That is the reason for the amount of RAM - virtualization with KVM.
Part 2 - the first take. Installation
The new approach
I failed with my first try. It is a pity.
Back to the drawing board. In the new approach I am going to use FreeBSD and Oracle ZFS (the open sourced).
But first things first. I wanted to use Ubuntu as the hosts OS and ZFS. How to combine? First I found ZFS-fuse. But never really liked it. Don't ask why. I don't know. Later I found ZFS on Linux, which I found more, how should I put it, tasteful. I downloaded it, compiled it and tried it. Worked fine. Great stuff! But I do not want to compile and remember all the details. What now? Gladly I found a PPA for ZFS. But the combination, Ubuntu and ZFS, did not work as good as I wanted and expected. Again, don't ask. It just did not appeal. Later, on several forums and blogposts, I found that FreeBSD had incorporated the latest version of ZFS in their version 9.0 and other blogposts described, more or less detailed, how to make a mirrored ZFS-root. FreeBSD started to grow on me and I tested it out. Conclusion? Great Stuff!
With the original design I wanted to run the file server as a virtual guest. That was also my approach when I started to look at FreeBSD. Later on I found out about Jails. A facility where you can contain a server, say a file server, without compromising the host. With using Jails I am hoping that I can exploit all the good stuff that ZFS offers (znapshots, zfs send/receive...) within the jailed server. It would be really great if I could present what Microsoft calls Previous version to the client. No matter if the client runs Linux or Windows.
So the new approach is FreeBSD and ZFS.
Part 2 - second take. Installation.
Configure your router for a local DNS domain.
I have got an old ASUS WL-500gP router. One of the first things I did was to install firmware from OpenWRT. An "out-of-the-box" installation with DNSMasq which has served me well. OpenWRT is a really good product. No doubt about it! Thank you all that have been working with the realization of OpenWRT router software.
But if you want to do more sofisticated stuff like mounting home directories on your home server using the servers name instead of IP address or even configure an Active Directory, you will need a DNS. Kerberos does not function without a DNS. This post will inform you how to configure OpenWRT to serve your home computers with DHCP and dynamic DNS.
The plan is to use two nameservers; one for the forward lookup zone and one for the reverse zone. To accomplish that we start out with configuring the router with both zones. Later on, after Samba4 is installed and configured, we move the forward zone to the servers name server and let the routers nameserver act as a slave for the forward zone. And vice versa. The DHCP server will update the reverse zone with RR:s and the domaincontroller will feed the forward zone.
Install required packages.
1. Install the following packages;
dhcp-server, bind-server, bind-check and bind-rndc. Uninstall dnsmasq.Start with configuring the DHCP server.
2. Edit
/etc/dhcpd.conf:

authoritative;

ddns-updates on;
ddns-update-style interim;
#ddns-update-style none;
update-static-leases on;
allow unknown-clients;
use-host-decl-names on;

include "/etc/rndc.key";

zone 1.168.192.in-addr.arpa. {
        primary 192.168.1.1;
        key "rndc-key";
}

option ntp-servers 192.168.1.1;

default-lease-time 43200;
max-lease-time 86400;

subnet 192.168.1.0 netmask 255.255.255.0 {
        option subnet-mask 255.255.255.0;
        option domain-name-servers 192.168.1.1, 192.168.1.10;
        option routers 192.168.1.1;
        option broadcast-address 192.168.1.255;
        range 192.168.1.101 192.168.1.200;

        option domain-name "vusir.local";
        ddns-rev-domainname "in-addr.arpa.";

        zone 1.168.192.in-addr.arpa. {
                primary 192.168.1.1;
                key "rndc-key";
        }

}
3. Generate a key for dhcpd and named to use: /usr/sbin/rndc-confgen -a. This generates the key file /etc/rndc.key.4. Start the daemon:
/etc/init.d/dhcpd start and check for errors.5. Check that your computer is being assigned an IP adress:
ipconfig /renew.Continue with configuring BIND.
6. Copy
/etc/bind/named.conf.example: cp /etc/bind/named.conf.example /etc/bind/named.conf.7. Edit
/etc/bind/named.conf and add your DNS domains:// This is the primary configuration file for the BIND DNS server named.
options {
directory "/tmp";
// If your ISP provided one or more IP addresses for stable
// nameservers, you probably want to use them as forwarders.
// Uncomment the following block, and insert the addresses replacing
// the all-0's placeholder.
forwarders {
208.67.222.222; // OpenDNS, primary
208.67.222.220; // OpenDNS, secondary
};
allow-query {
192.168.1.0/24;
127.0.0.1;
};
allow-transfer {
192.168.1.0/24;
127.0.0.1;
};
auth-nxdomain no; # conform to RFC1035
};
// RNDC-key
include "/etc/rndc.key";
controls {
inet 127.0.0.1 allow {
localhost;
}
keys {
rndc-key;
};
};
zone "vusir.local" {
type master;
file "/etc/bind/db.vusir.local";
allow-transfer { any; };
// masters { 192.168.1.3; };
};
zone "1.168.192.in-addr.arpa" {
type master;
file "/etc/bind/db.192.168.1";
allow-update {
key "rndc-key";
};
notify yes;
};
// prime the server with knowledge of the root servers
zone "." {
type hint;
file "/etc/bind/db.root";
};
// be authoritative for the localhost forward and reverse zones, and for
// broadcast zones as per RFC 1912
zone "localhost" {
type master;
file "/etc/bind/db.local";
};
zone "localhost" {
type master;
file "/etc/bind/db.local";
};
zone "127.in-addr.arpa" {
type master;
file "/etc/bind/db.127";
};
zone "0.in-addr.arpa" {
type master;
file "/etc/bind/db.0";
};
zone "255.in-addr.arpa" {
type master;
file "/etc/bind/db.255";
};8. Check configuration file:
named-checkconf /etc/bind/named.conf. No output means correct file.9. Edit zone files;
/etc/bind/db.vusir.local and /etc/bind/db.192.168.1.
vi /etc/bind/db.vusir.local:
$ORIGIN .
$TTL 3600 ; 1 hour
vusir.local IN SOA ojoj.vusir.local. hostmaster.vusir.local. (
1 ; serial
900 ; refresh (15 minutes)
600 ; retry (10 minutes)
86400 ; expire (1 day)
0 ; minimum (0 seconds)
)
$ORIGIN vusir.local.
NS ohlala.vusir.local.
NS ojoj.vusir.local.
ojoj A 192.168.1.1
ohlala A 192.168.1.3
vi /etc/bind/db.192.168.1:
$ORIGIN .
$TTL 3600 ; 1 hour
1.168.192.in-addr.arpa IN SOA ojoj.vusir.local. hostmaster.vusir.local. (
1 ; serial
900 ; refresh (15 minutes)
600 ; retry (10 minutes)
86400 ; expire (1 day)
0 ; minimum (0 seconds)
)
NS ohlala.vusir.local.
NS ojoj.vusir.local.
$ORIGIN 1.168.192.in-addr.arpa.
1 PTR ojoj.vusir.local.
3 PTR ohlala.vusir.local.
10. Check the zone files.
root@ojoj:~# named-checkzone vusir.local /etc/bind/db.vusir.local
zone vusir.local/IN: loaded serial 6
OK
root@ojoj:~# named-checkzone 1.168.192.in-addr.arpa /etc/bind/db.192.168.1
zone 1.168.192.in-addr.arpa/IN: loaded serial 7
OK
root@ojoj:~#
11. Start name server:
/etc/init.d/named start12. And test.
C:\ nslookup -type=NS vusir.local
Server:  ojoj.vusir.local
Address:  192.168.1.1

vusir.local       nameserver = ojoj.vusir.local
ojoj.vusir.local  internet address = 192.168.1.1
13. Restart dhcpd and named:
/etc/init.d/dhcpd restart
/etc/init.d/named restart
14. Done!
When Samba is installed and configured to serve the name server with computer names we change the following:
15. In
/etc/bind/named.conf we change the following part:
zone "vusir.local" {
        type slave;
        file "/etc/bind/db.vusir.local";
        allow-transfer { 192.168.1.0/24; };
// <-Remove       masters { 192.168.1.3; };
};
16. Restart named on the router:
/etc/init.d/named restart
17. And restart named on the server:
/etc/init.d/bind9 restart
18. And test.
C:\ nslookup -type=NS vusir.local
Server:  ojoj.vusir.local
Address:  192.168.1.1

vusir.local         nameserver = ohlala.vusir.local
vusir.local         nameserver = ojoj.vusir.local
ohlala.vusir.local  internet address = 192.168.1.3
ojoj.vusir.local    internet address = 192.168.1.1
19. Done!

